Showing posts with label painting. Show all posts

Friday, April 14, 2017

Rising from the ashes with Kingdom Death - Monster (Core game)

Been painting my copy of Kingdom Death lately so decided to take some pictures and post them. So let's get to the chase in the order that I painted them in:


Starting survivors:


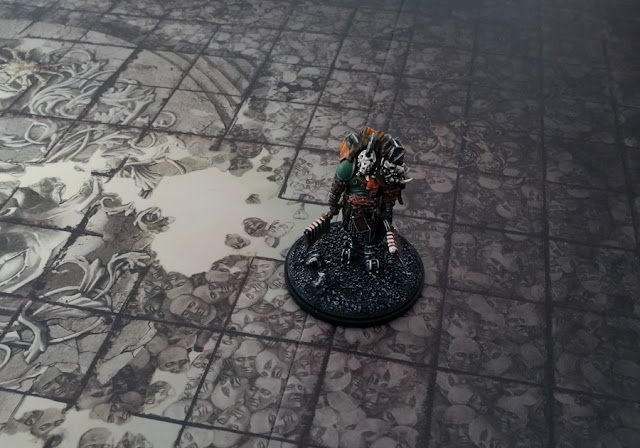
These were fun models to paint and I tried different ways in painting each of their skins. I'm not too fond of the face-bases myself to be honest as I think they are a bit boring if used universally. And let's face it, there's other stuff on the ground as well in the world of kingdom death: grass, gravel, trees, stumps and all kinds of foliage.
I decided to use face-bases on the initial survivors, but for others I went with a pretty basic gravel/stone -harsh bases with some random faces thrown in the mix. (I made copies of the face-bases with greenstuff and cut individual faces off for the bases).

For a while I also thought about just leaving the monster bases black, but when I got to the phoenix I realized I need to do something. They just didn't feel "finished" to me and the tree stump that phoenix has felt so out of place on a plain black base.


White lion:


Pretty basic miniature to be honest. Rather easy paintjob done mostly with the airbrush. I wish the lion had an "angrier" face, to me it's just rather boring. Made some intestines etc on it's mouth to gruesome it up a bit. (This involved dipping a hair in gloss-varnish with paints mixed in). :p


Screaming Antelope:


As much as I am a fan of KD:s miniatures, I really don't like this model all that much. It's my least favourite from the core games miniatures. It's "just an antelope" with some gore thrown in the underside. Rather quick and easy paintjob as well, I just wanted it out of the way.


Butcher:


Nice sculpt and a rather fun model to paint. Went with a green armour that I did mostly with an airbrush, which I then highlighted and glazed a bit. Used a lot of airbrushing on the lanters on it as well, even though I didn't take pictures from it's back where most of them are.


Phoenix:


Phew, this was a handful to get painted. (let alone assemble, the individual hands on the wings were a nightmare). I assembled the model all the way before painting it so it was a hard model to move. Ended up using a lot of turn-table with this one while painting.
Wings are mostly done with an airbrush by using multiple passes of different colors. Also used washes and some very light drybrushing in the end.
I really like what the elevation with the base did to the model. It looks a lot more menacing and I think the posture fits a lot better as now the angle is better when it has a model in front of it. (It has a bit of a hunchback).

But all in all it's an awesome model, the detailing is just superb.
I got an extra phoenix by backing the first KD, but I don't see myself building and painting it anytime soon, it was such a big project to finish. :p


Models on the board:

Some pictures that I quickly took with some of the models on the board, so you can see how they blend in and look in an authentic environment. :p


Closing arguments:


 I have more on the way as well. I finished the Manhunter but I decided to keep this post just about the contents of the core game, to not confuse anyone new. Will post the expansions as separate updates as I finish them.

I also fully magnetized the rawhide armor set -survivors but I haven't painted them yet. Took some wip pictures as well.

Stuff to look at to in the future as well (that I have, but haven't painted yet):

- Dragon king (wip)
- Flower knight
- Lion knight
- Dung beetle knight
- Lonely tree (wip)
- Random promotional miniatures
- "KD 1.5 stuff: Gamblers chest -once it ships".

Will probably be focusing on some of the survivors next to get enough done to play the game fully painted.

Thanks for looking!

ps: Sneak peek at the setup (not very hightech as I had plenty of sunlight so no need for the spotlights):

Thursday, January 31, 2013

Kingdom Death wip

Hi all.

I took some work in progress pictures when I was painting my Great Game Hunter, so I thought I might as well drop them in here.
They were taken at the very late stages of painting though so there's not much of seeing as progress goes. I also took the pictures with my phone so the quality isn't anything special.

Anyhow:


 Here's a picture of taking a picture, because that's just how I roll!


I got some different backdrops, have to test them out at some point. For the photos I only had the two halogen-lights, otherwise the room was fully dark
If you are wondering why the camera is so far from the miniature, reason is that I was using a 105mm macro lens -which gets you pretty close even from a distance. (as you can see from the lcd-screen).

I have some old and new stuff that I am working on right now, I will post some updates once I get something to show. :)

Regards,

TabletopCop

Wednesday, May 9, 2012

Harder & Steenbecks Infinity Solo -airbrush

A little spotlight on the airbrush that I am using to paint my miniatures.

About a year/year and a half ago I decided to get an airbrush. I read a lot of info on different airbrushes but eventually I got Harder & Steenbecks: Infinity Solo airbrush. (I first noticed it when Les from Awesomepaintjob.com used it in one of his videos).

It comes with incredibly small 0,15mm nozzle. You can paint very small areas with it which fits miniature-painting perfectly. Downsize in this ofcourse is that it chokes up rather easily, so you have to keep the concistency on the paint very thin. I have a few most used paints in different pots, but usually I just mix up my paints straight in the cup. Few drops of water and a drop of paint, and sometimes a drop of retarder to longen the drying-time.

I only have the 2ml paint cup for this, but it has been more than enough on my projects.

It's not the cheapest of airbrushes but you get what you pay for. So if you are looking for a A-grade airbrush I can whole heartedly recommend this one. (There are multiple A-grade airbrushes to choose from but this one is the only one I have personally used).

Pics of the airbrush:


Now a good quality airbrush ofcourse needs a steady stream of air to support it.
I paint inside my "computer room" -so I needed it to be as silent as possible and it had to be indoor-usable. Small size is also a plus so I can store it away. This ruled out the big ones with a tank.

Eventually I got a Sparmax -compressor which is made for airbrushing:


I didn't notice to put anything next to it to give a size comparison, but it is small. Since it doesn't have a tank it's always on when I paint, but it's pretty silent. It has a regulator for the airflow, and a moisture trap fitted out of the box which is nice. So far it has been working perfectly for my needs.


Airbrush is a great tool in miniature painting. It takes some practice but It's easy to set up and get going once you get the hang of it.

Thx for looking, and if you have any questions feel free to drop a comment. :)


TabletopCop

Sunday, April 22, 2012

Pimp up your boardgames!

I'm a sucker for quality components on boardgames, and games that have nice miniatures or other cool components often catch my eye.

I also have a habit of pimping up my boardgames. I usually try to spend fairly little time in painting boardgame-components, and just give them a basic tabletop quality. Still often due to the sheer amount of pieces I always fail miserably in getting everything done.


Anyway, here is a few examples of my tuned components:


Ghost Stories:


Just a quick paintjob on the monks made them come alive nicely. Just used basic basecolors and then dipped them. (Even though I'm not a fan of dipping, I find that it works pretty well on boardgames as you can get a lot done fairly fast, and dipping gives a very hard and durable coating on the figures).


Cyclades:


Just a quick paintjob on the Kraken. As usual I have yet to paint rest of the miniatures. :)


Battlestar Galactica:


Ok, this was more like a prototype so to speak. I ended up not doing this to every ship in the game mostly just because the cost of the bases was pretty high. Eventually I just primed the ships in black and drybrushed some metal on them.


World of Warcraft - the boardgame:


Wow - the boardgame holds a special place in my heart. My girlfriend bought it for me as a present when she saw me eyeing it in a store. It was one of the first boardgames in my collection.
The box is huge and full of stuff. So huge infact that it doesn't fit on my shelf where I hold rest of my boardgames. As a game it's pretty fun also if you have the right group. Just make sure you have a lot of time when you brake this bad boy open. :p


Last Night on Earth:


All the zombies are painted!


Painted heroes, although I have two more heroes two finish. After that I have the whole basegame painted up. :)
btw: Very nice and fast/light game if you like the zombie-theme. I have played this with gamers and non-gamers and it has been a hit with both!


Mansions of Madness:


One of my newest boardgame-projects. Finished all the heroes pretty fast. Again, basecoated and dipped but this time took a bit more time with them.

Hope you enjoyed!


TabletopCop


Tuesday, April 10, 2012

Vallejo Pigments

Hi everyone.

Picked up a few Vallejoe pigments recently to try out:


Now, I have absolutely no experience with pigments so we will see how this experiment of mine ends. I am planning on making a small Cryx army and I want them to look very battered and rusty so these might do the job.
I'l post some pictures and my initial impressions when I get something done. :)

Happy painting everyone!

Sunday, April 8, 2012

Working area

Hi everyone and happy easter! I decided to show you my working area where I do my modelling.

I have actually crammed a lot of stuff into the old painting table from GW. For it's size it holds a lot of stuff, so It's usually looking horribly messy.
I hold the table in my "computer-room" next to my pc as you can see. That's why I have crammed everything on to the table, so I can lift the whole thing and hide it into my closet when I don't need it.

Also includes a sneak peek of my work in progress BE:


I have some more paints, brushes, foliage etc in different containers. On the table I hold mostly only the stuff that I use regularly. As you can see I still have a lot of the old paints from GW, but I am slowly shifting into Vallejoes and PP:s stuff.

Believe it or not I also do my airbrushing here in the same place and it works like a charm. :)

My assistant that likes to watch me paint:


Cat's name is Nikolai, as it's of a breed called: Russian blue. (Just between you and me, It's not a very good assistant.. it pokes every small bit on the table, and it keeps trying to drink my brushwater from the cup).

So what do you think of the workplace? Do you have a dedicated working area, or do you resort to a similar setup of mine that you can hide away as necessary?

Thanks for looking and again: Happy easter everyone! :)